

What You’ll Build
- A Knowledge Base in Knowledges that crawls your website and stores the content as vector embeddings
- An agent in Agent Creator that answers questions using the Knowledge Base as its source of truth
- A public chat URL and an embed widget generated from the agent’s Share Agent dialog, ready to drop into any website
This solution turns static website content into an interactive knowledge base, giving visitors a conversational way to find information instantly.
Prerequisites
Before starting this tutorial, make sure you have:- An active Prisme.ai account with access to Knowledges and Agent Creator
- A website URL with content you want to make conversational
- Basic understanding of HTML (to embed the chat widget on your site)
Step 1: Create a Knowledge Base
Start by creating the Knowledge Base that will store your website content as embeddings.1
Open Knowledges
From the Prisme.ai platform, open the Knowledges product.
2
Create a new Knowledge Base
From Knowledge Bases in the Knowledges sidebar, click + Create (or use the Dashboard’s + New Knowledge Base tile, same dialog). Give it a clear name (for example, “Company Website”) and pick the embedding model you want to use.
3
Save
Save the Knowledge Base to open its detail view.

Step 2: Add the website as a Web Source
The Knowledge Base ingests pages directly. Inside the Knowledge Base detail page, the Add Web Source action handles both single-page additions and full-site auto-discovery.The global Connectors entry in the Knowledges sidebar is a separate, cross-Knowledge-Base concept. It is not how websites are added. Web ingestion lives on a Knowledge Base’s own detail page, alongside file uploads.
1
Open the Knowledge Base
From Knowledges → Knowledge Bases, click the Knowledge Base you just created. You land on its detail page where its files and web sources are listed.
2
Click Add Web Source
Use the Add Web Source button next to Add Documents. (If the Knowledge Base is still empty, the same action is available from the dashed “Add a web source - Crawl a website or add a single URL” tile.)
3
Pick the right tab
The modal has two tabs:
- Single URL: adds one specific page (placeholder
https://example.com/page). Use this when you only want to ingest a few hand-picked URLs. - Auto-Discovery: crawls the whole website starting from a root URL. Use this for full-site ingestion.
4
Enter the website URL and tune the crawler
Fill in the Website URL (e.g.
https://example.com). The Auto-Discovery tab exposes per-hostname crawler settings:- Path filter: restrict the crawl to a subtree (e.g.
/docs). - Blacklisted patterns: skip URLs matching given patterns (e.g.
/admin/.*). - Respect robots.txt: toggle (default on).
- Sitemap only + Sitemap URL: drive the crawl from a sitemap.
- XPath filter: only index nodes matching an XPath, e.g.
//article | //main. - HTTP headers: custom request headers (e.g.
Authorization,Cookie) for sites that need auth.
5
Submit
Click Start Crawling. The Knowledge Base PATCHes its
websites list and websites_config map and the crawl runs in the background. Once submitted, the new entry appears under the Web Sources list on the Knowledge Base page with a per-source row summarizing its config and indexed page count.6
Tune the store-level crawler limits
Per-page-count limits and re-crawl interval are Knowledge-Base-level, not per-source. Open the Knowledge Base Settings tab to set:
- Max pages: overall crawl budget for the Knowledge Base.
- Re-crawl interval: manual or a fixed interval.
Crawling and embedding can take time depending on site size. You can begin testing as soon as some pages are processed. A maximum document quota is often enforced on your instance; contact your internal point of contact if you hit the limit.You can re-crawl any web source on demand using the row’s Re-crawl action, edit its hostname config via Edit Config, or remove it via Remove.
Step 3: Inspect indexed content
Once crawling starts producing results, verify ingestion directly from the Knowledge Base.1
Open the Knowledge Base
From Knowledges → Knowledge Bases, click your Knowledge Base.
2
Browse Web Sources and indexed pages
The Knowledge Base detail page lists each Web Source with its current pages indexed count. Underneath, the file list shows the actual indexed pages. Use the Source type filter (
all / file / web) to focus on web content.3
Spot-check chunking and retrieval
Click a row to inspect how a page was chunked. The Knowledge Base supports a built-in query test from the chat-with-KB surface; confirm relevant passages come back for representative questions.
Step 4: Create the agent in Agent Creator
With the Knowledge Base ready, build the agent your visitors will chat with.1
Open Agent Creator
From the Prisme.ai platform, open Agent Creator.
2
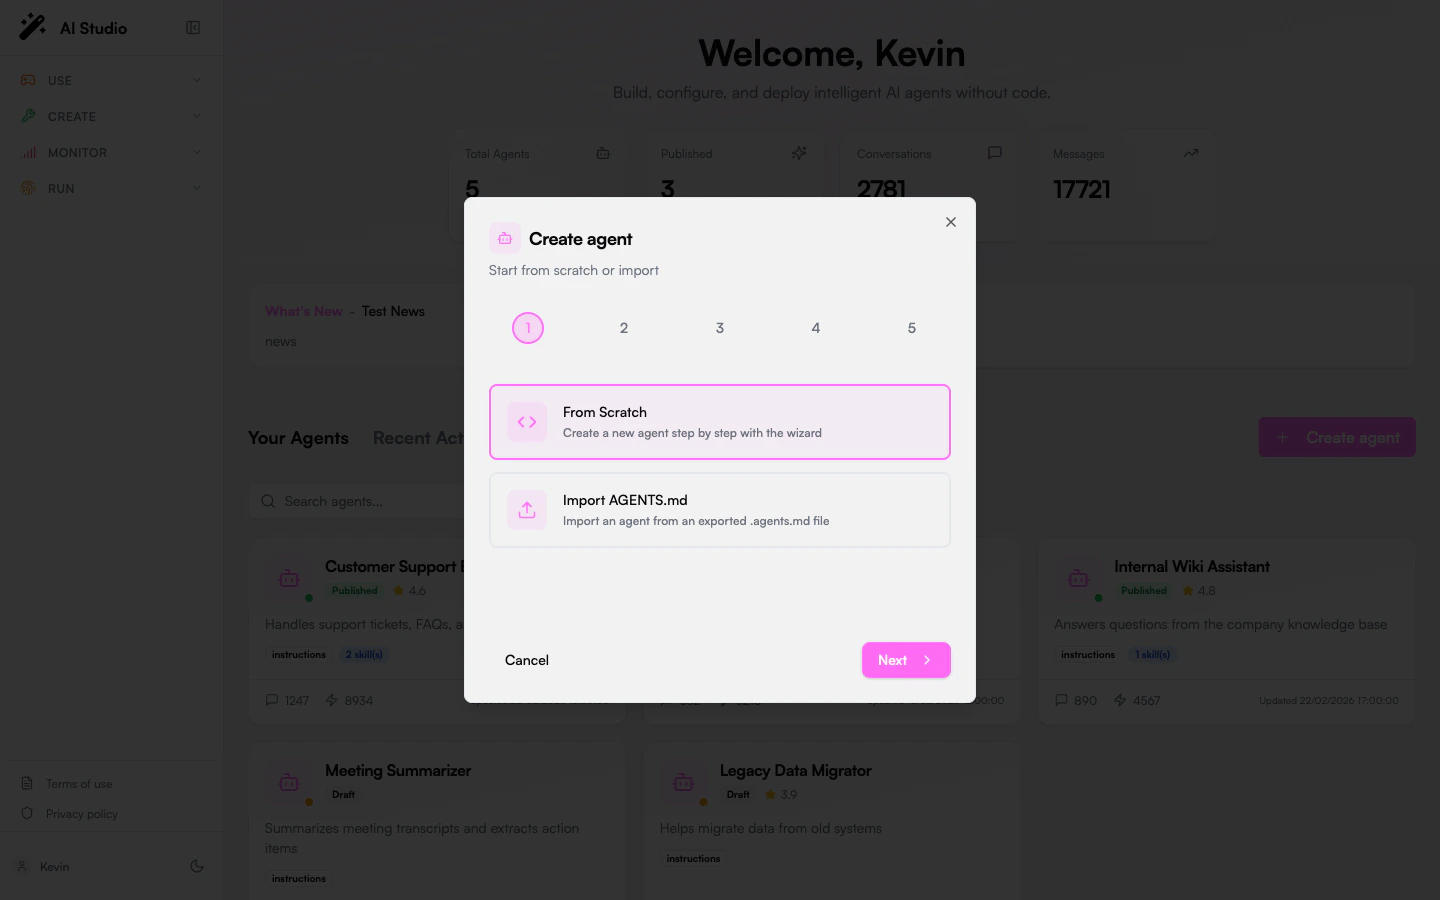
Create a new agent
Click + Create agent and set:
- Name (for example, “Website Assistant”)
- Model for generation
- Instructions, for example: “Answer the user based on the indexed website content. Cite sources when possible. If the answer isn’t in the indexed content, say so clearly.”
3
Attach the Knowledge Base
In the agent’s configuration, attach the Knowledge Base you created in Step 1 as a knowledge source.
4
Save the agent
Save your changes.
Step 5: Test the agent in the playground
1
Open the Playground
From your agent in Agent Creator, open the Playground tab.
2
Ask questions
Try realistic questions about your website’s content.
3
Inspect sources
Review the cited sources / passages returned alongside each answer to confirm the agent is grounded in the right pages. Refine your instructions or Knowledge Base settings if needed.
Step 6: Share the agent
Once the agent answers correctly in the Playground, expose it to your audience.1
Open the Share menu
From your agent in Agent Creator, open the Share menu (in the agent header). The dialog gathers the surfaces available on your instance: for example, an access bindings panel for inviting users or groups, and (depending on instance configuration) a public link or embed snippet.
2
Copy whatever the dialog exposes
Copy the link, snippet, or invitation flow shown in the Share dialog. Available options vary by instance: some configurations expose a hosted chat URL and a
<script> embed for your website, others ship only access-binding controls. Use what your instance shows; don’t paste a URL pattern that isn’t surfaced in the dialog.If your instance doesn’t ship a public chat / embed widget out of the box, you can still front the agent with a small page in Builder that calls
Agents.sendMessage from a webhook automation (see the Webhook Builder tutorial) and renders the response in a custom React SPA.Step 7: Place the agent on your site
1
Use the Share output
If your Share dialog produced a hosted URL, link to it from your website. If it produced a
<script> embed snippet, paste it just before the closing </body> tag of your site.2
Verify the integration
Open your website and confirm the link or embedded chat works against the agent backed by your Knowledge Base.
Step 8: Understanding the architecture
Your website chatbot is powered by a Retrieval-Augmented Generation (RAG) pipeline that spans Knowledges and Agent Creator: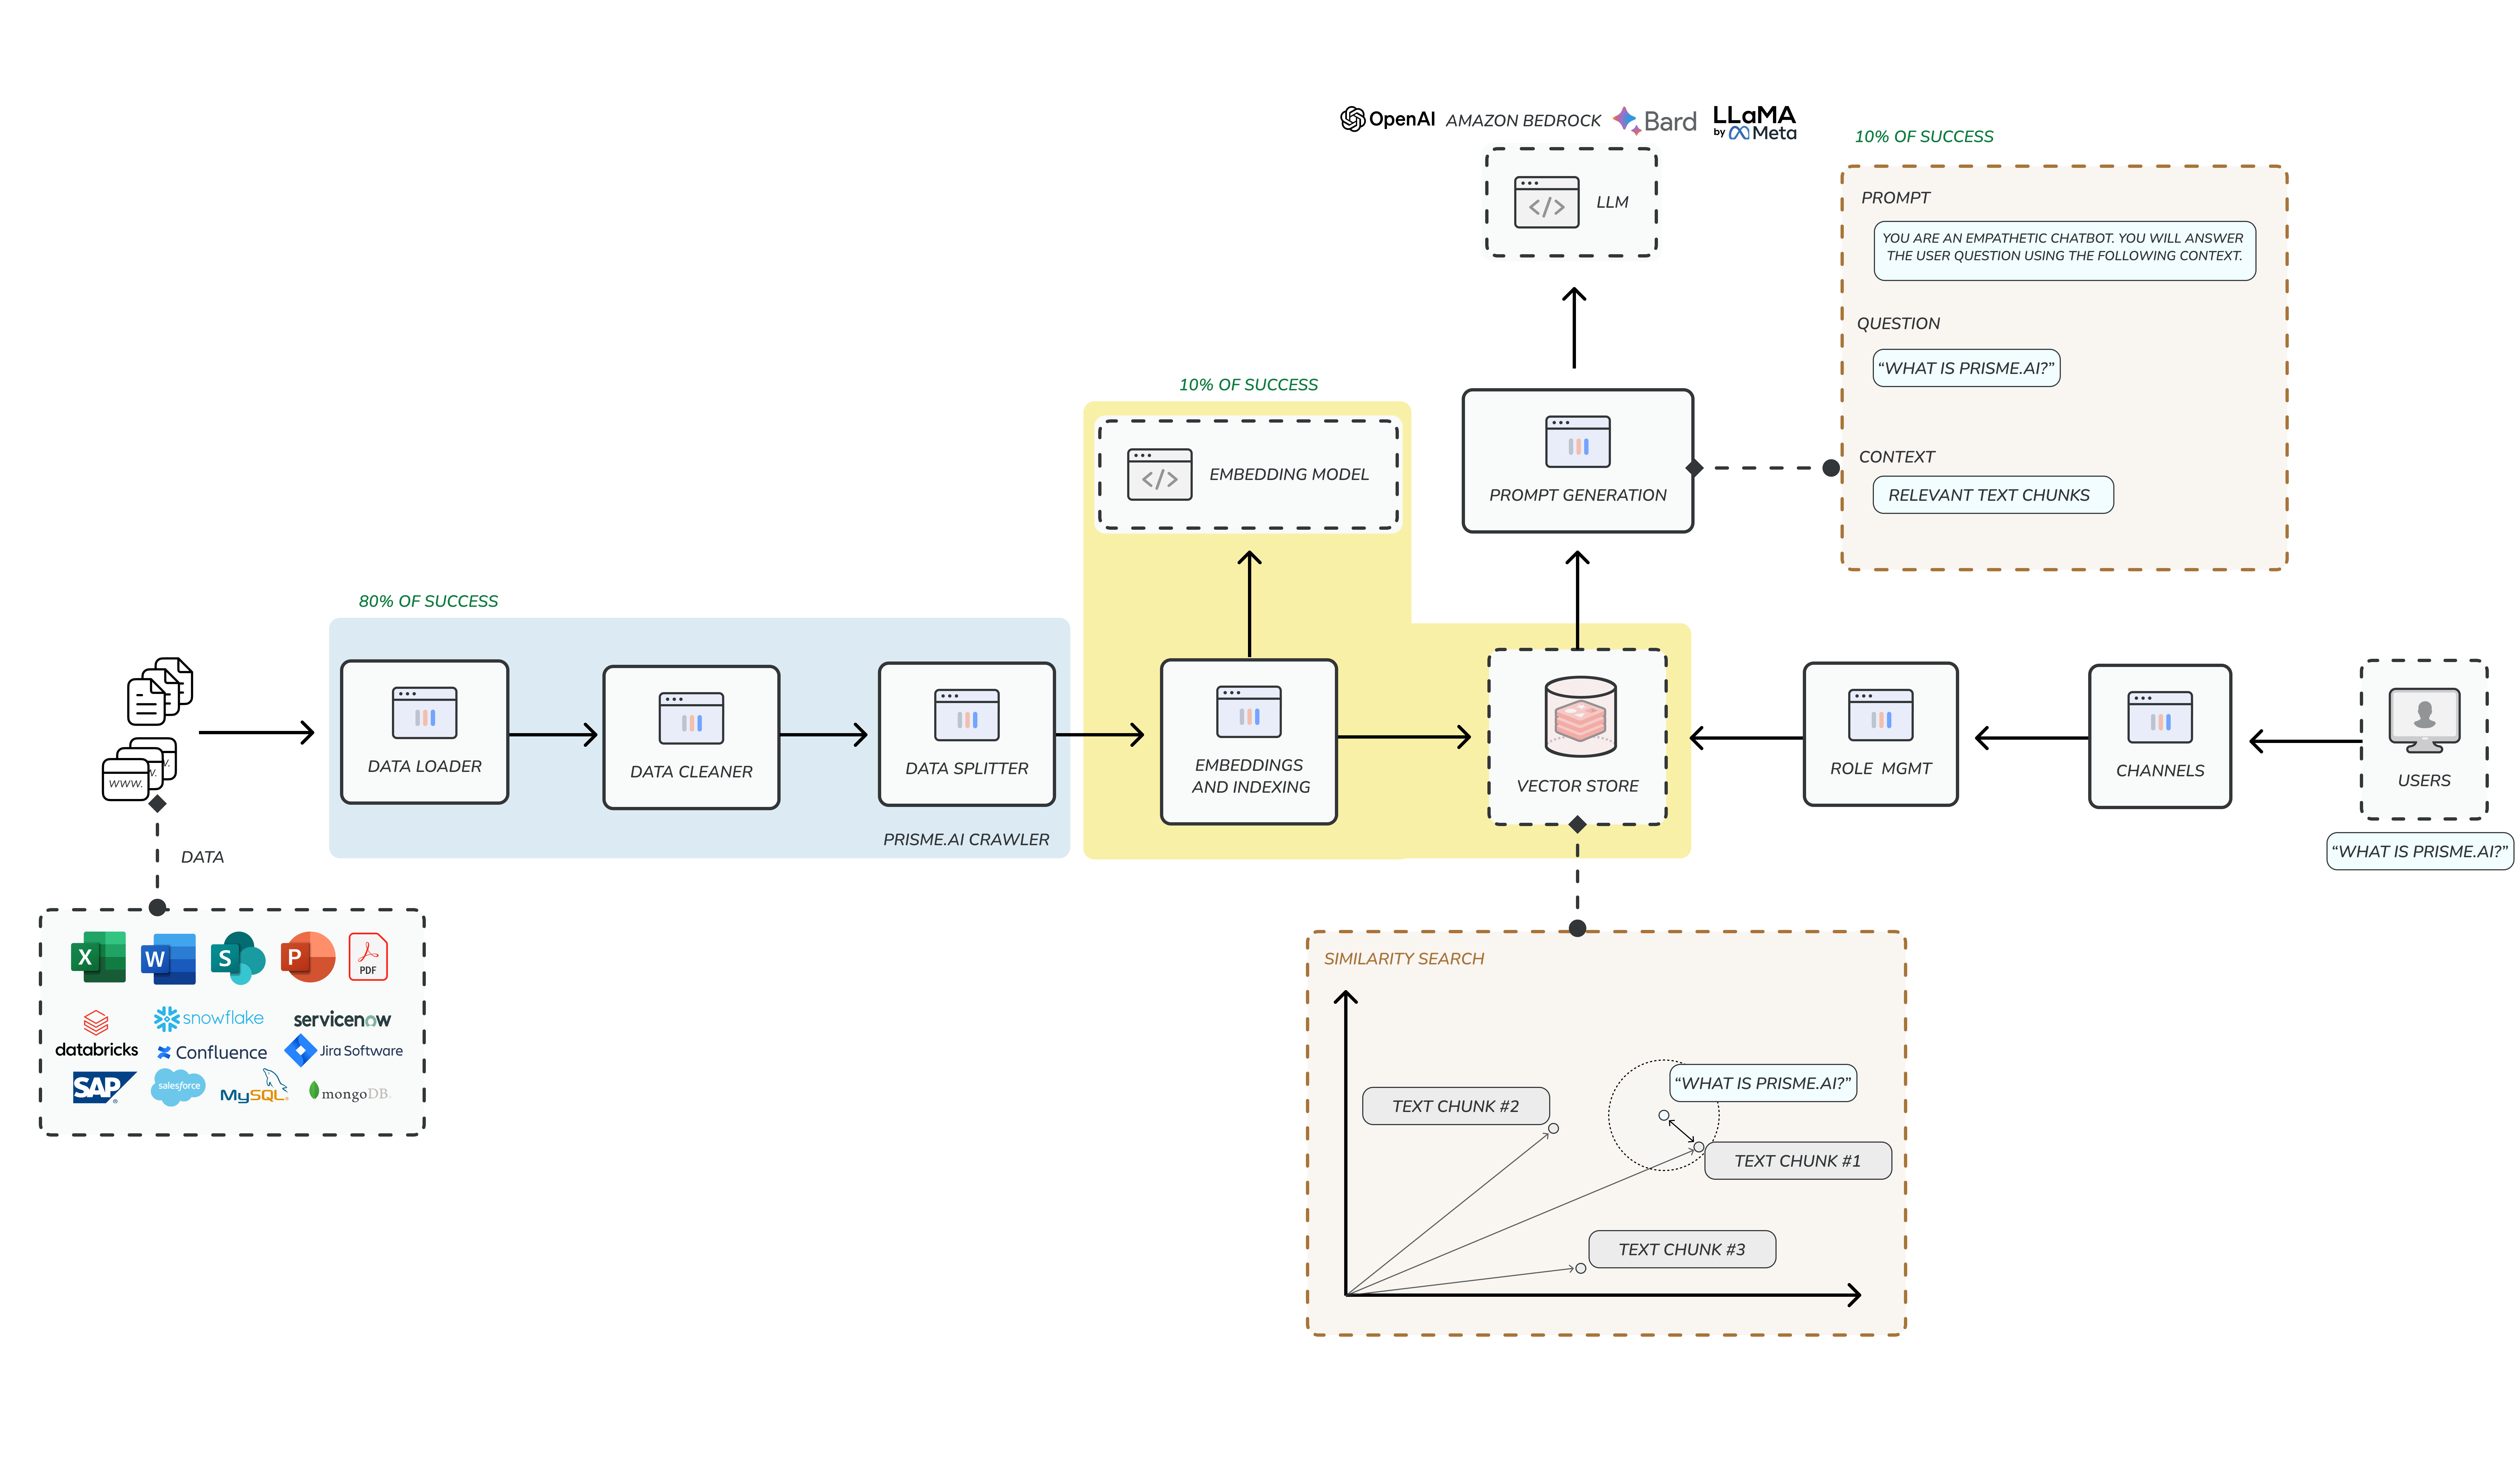
- Document processing: The Knowledge Base’s web crawler fetches the website you registered as a Web Source, segments content into chunks, and stores vector embeddings
- Query understanding: When a visitor asks a question, the agent processes and enhances the query for better retrieval
- Relevant content retrieval: The Knowledge Base returns the most relevant chunks from your indexed pages
- Response generation: The agent uses those chunks as grounded context to generate a comprehensive, accurate response
Knowledges breaks documents into optimally sized chunks for efficient retrieval. Chunk size and overlap are configurable from the Knowledge Base settings, so you can tune them to your content.
Step 9: Advanced customization
For power users who need to go beyond the default ingestion path:1
Tune Knowledge Base settings
From the Knowledge Base settings, fine-tune embeddings, chunking, and query enhancement.
2
React to Knowledge Base events
Subscribe a Builder automation to Knowledge Base events (document add/update/delete, query) to trigger custom processing: anonymization, audit logging, downstream notifications. See the Automations reference for the trigger syntax.
3
Custom ingestion in Builder
For full control, run a Builder workspace with the Crawler app and custom automations to feed documents into your Knowledge Base via its API.
4
Custom code
Implement advanced RAG pipelines (LlamaIndex, LangChain, etc.) using Python Custom Code inside Builder, then push results into the Knowledge Base.
Step 10: Monitoring
Keep your website chatbot performing at its best:1
Agent analytics
Open the Analytics tab on your agent in Agent Creator to track usage, latency, and popular questions.
2
Insights product
For deeper conversation analysis, topic clustering, and adoption metrics across agents, use the Insights product.
3
Refresh content
Let the crawler re-run on its configured periodicity (or trigger Re-crawl on the Web Source row manually) to keep the Knowledge Base aligned with your live website.
4
Iterate on instructions
Adjust the agent’s instructions and Knowledge Base settings based on observed gaps and user feedback.
Best Practices for Website RAG Agents
To maximize the effectiveness of your website chatbot:Content Structure
Organize your website content with clear headings and logical structure for better chunking
Regular Updates
Schedule regular recrawling to keep your chatbot’s knowledge current
User Guidance
Provide example questions to help users understand what they can ask
Response Tuning
Adjust chunk size and retrieval settings based on the nature of your content
Conclusion
You’ve turned your static website into an interactive, grounded chatbot: Knowledges handles ingestion and retrieval, Agent Creator handles the conversation and the embed surface, and your visitors get fast, contextual answers to their questions. Beyond the better visitor experience, you also gain visibility into what people are looking for on your site, feeding directly into how you improve your content.Next Steps
Build a Document Classification System
Create an AI system that automatically organizes uploaded documents
Create a No-Code RAG Agent
Explore more advanced RAG capabilities without writing code
Implement Webhook Integration
Connect your RAG agent to other systems using webhooks
Develop Custom Applications
Build more sophisticated applications using Builder