> ## Documentation Index
> Fetch the complete documentation index at: https://docs.prisme.ai/llms.txt
> Use this file to discover all available pages before exploring further.

# Pages

> Build and preview React pages from source files in Builder

<Frame>
  <img src="https://mintcdn.com/prismeai/DqMytpkd4s_f0V1S/images/pages.png?fit=max&auto=format&n=DqMytpkd4s_f0V1S&q=85&s=39fa8e66c8477a93a2f5388637f6f54e" alt="Builder page preview with the Pages section selected" width="1350" height="953" data-path="images/pages.png" />
</Frame>

Pages are the frontend part of a Builder workspace. In the current Builder, a page is managed as a React application source tree, not as a block canvas. You edit files, preview the compiled app, and connect the interface to workspace automations through HTTP endpoints, WebSocket events, and the injected Prisme.ai SDK.

Use pages when users need a custom interface around an agent, workflow, internal tool, dashboard, or integration.

## Coming from the legacy block editor?

If your workspace was originally built on the legacy YAML/block page editor, the new Builder treats those pages as **runtime-only**.

* Existing legacy pages **keep running** after the upgrade — end users see no change at the URL they had bookmarked.
* They are **not editable** in the new Builder UI. The block editor is gone; the page tab only opens React source trees.
* To make a change, the page must be **rewritten** as a React/Vite app from a new page entry. There is no automatic conversion of legacy blocks to React components — the rendering model is different (server-rendered blocks vs client-rendered SPA).

A practical migration path:

1. Identify the page you want to change. Note its URL, the automations it calls, and the events it emits or listens to.
2. Create a new page in the Builder and initialize the React/Vite template.
3. Reproduce the UI with the components of your choice (Radix, the platform's design system, or anything else).
4. Wire the new page to the same automations and events (see [Connect to Automations](#connect-to-automations)).
5. Deploy the workspace and switch the public URL to the new page.

The legacy page documentation is still available in the [Legacy documentation site](https://prismeai-legacy.mintlify.app/) (link in the footer) for as long as legacy pages remain in active workspaces.

## What Changed

<CardGroup cols={2}>
  <Card title="No Legacy Canvas" icon="ban">
    The old visual block editor is no longer a Builder navigation item. User interfaces are built from React components and files.
  </Card>

  <Card title="Code and Preview" icon="code">
    Pages have a source editor and a native preview. Switch between them from the page toolbar.
  </Card>

  <Card title="React Template" icon="wand-magic-sparkles">
    A new page can initialize a React, Vite, Tailwind CSS, and Radix-based starter application.
  </Card>

  <Card title="Deployment Preview" icon="lock">
    Deployed bundles can appear in the Pages list as read-only previews.
  </Card>
</CardGroup>

## Page Workspace

The Builder layout is organized around the workspace sidebar:

* **Overview** shows usage, recent changes, errors, and quick actions.
* **Activity** shows event traces and correlation IDs.
* **Pages** contains editable source pages and read-only deployed bundles.
* **Automations** contains backend workflows and webhooks.
* **Imports** manages installed apps, custom code, and integration packages.
* **Files** lists uploaded workspace assets.
* **Settings** manages workspace configuration, sharing, secrets, and RBAC.

The editable page currently appears as `index`. It represents the source app that Builder compiles and previews.

## Create a Page

<Steps>
  <Step title="Open the workspace">
    In AI Studio, open **Create** > **Builder**, then select the workspace that should contain the page.
  </Step>

  <Step title="Open Pages">
    Select **Pages** in the Builder sidebar. If the workspace has no page source yet, click the **+** action or initialize the template from Code mode.
  </Step>

  <Step title="Initialize the template">
    Builder creates a starter React app with files such as:

    * `src/App.tsx`
    * `src/main.tsx`
    * `src/styles/globals.css`
    * `index.html`
    * `package.json`
    * `vite.config.ts`
  </Step>

  <Step title="Edit the source">
    Switch to **Code** and edit the source files. The file tree supports folders, file selection, file creation, and file rename.
  </Step>

  <Step title="Preview the app">
    Switch back to **Preview**. Builder compiles the React source and renders it in the native preview area.
  </Step>

  <Step title="Save the page">
    Click **Save** when the page works as expected. Saving synchronizes the source files to the workspace.
  </Step>
</Steps>

## Code Mode

<Frame>
  <img src="https://mintcdn.com/prismeai/DqMytpkd4s_f0V1S/images/ai-builder-pages-code.png?fit=max&auto=format&n=DqMytpkd4s_f0V1S&q=85&s=ba97dd57edd767ff9cdb2656938839a1" alt="Builder page code mode with the source file tree and React editor" width="1350" height="953" data-path="images/ai-builder-pages-code.png" />
</Frame>

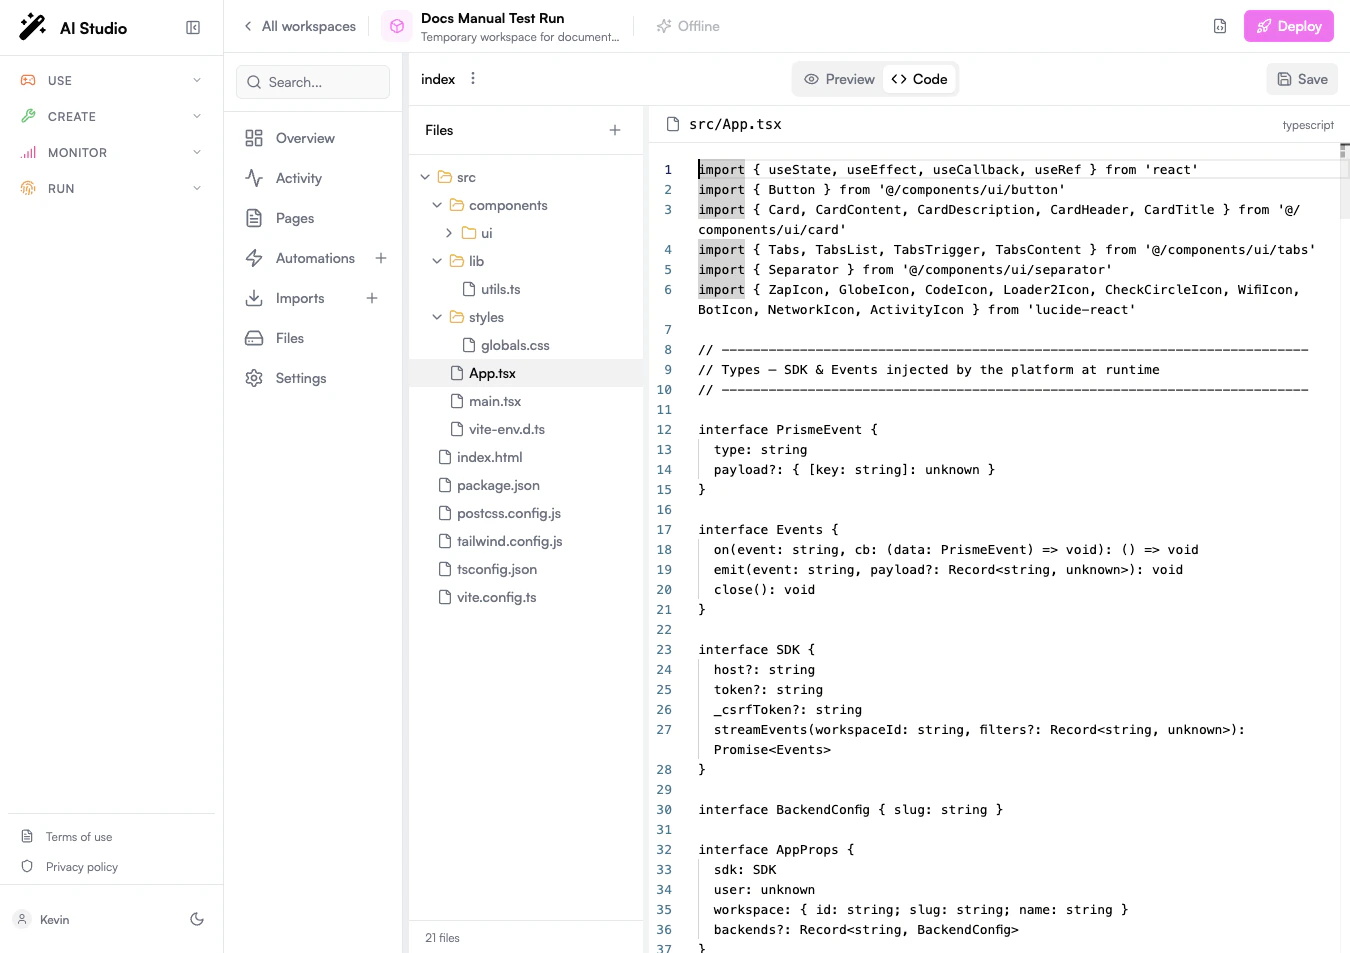
Code mode is where the page source lives. Use it to:

* Edit React and TypeScript files.
* Add reusable components under `src/components`.
* Update global styles under `src/styles`.
* Add utility functions under `src/lib` or `src/hooks`.
* Configure Vite, Tailwind CSS, TypeScript, and package metadata.

Builder tracks unsaved changes and enables **Save** when files have changed.
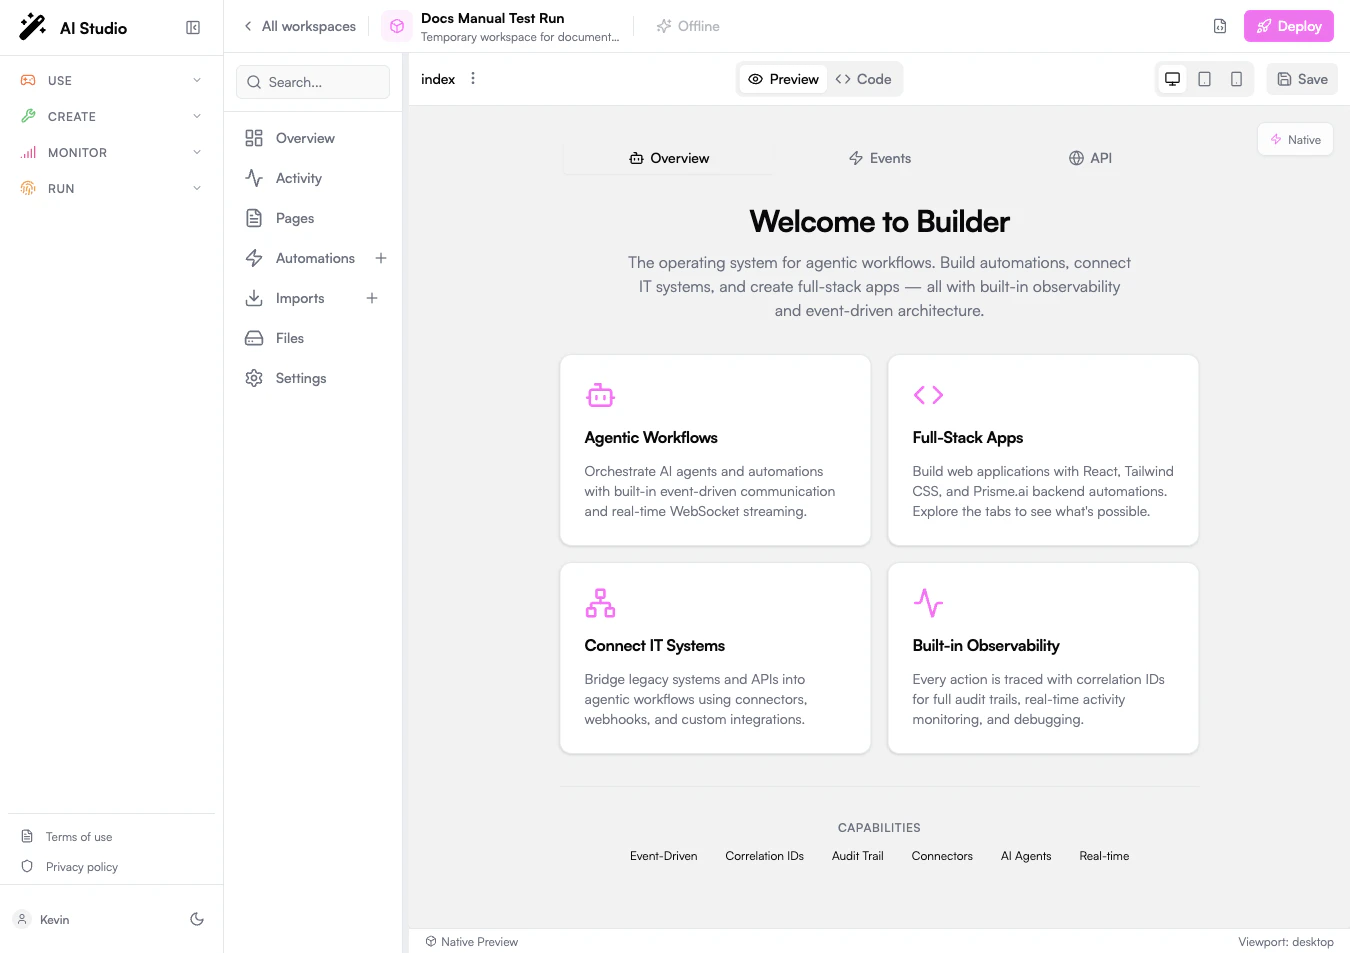
## Preview Mode

Preview mode compiles the source and renders the page inside Builder. Use the device controls to test:

* **Desktop**
* **Tablet**
* **Mobile**

The preview receives runtime context from the platform:

```tsx theme={null}
interface AppProps {
  sdk: SDK
  user: unknown
  workspace: {
    id: string
    slug: string
    name: string
  }
  backends?: Record<string, { slug: string }>
}
```

Use this context to call workspace webhooks, stream events, and adapt the interface to the current workspace or user.

## Connect to Automations

Pages usually become useful when they call or listen to automations.

<Tabs>
  <Tab title="HTTP Webhooks">
    Use an automation with an endpoint when the page needs request-response behavior.

    ```tsx theme={null}
    async function runAutomation(sdk: SDK, workspaceSlug: string) {
      const response = await fetch(
        `${sdk.host}/workspaces/slug:${workspaceSlug}/webhooks/myAutomation`,
        {
          method: "POST",
          headers: {
            "Content-Type": "application/json",
            ...(sdk.token ? { Authorization: `Bearer ${sdk.token}` } : {}),
            ...(sdk._csrfToken ? { "x-prismeai-csrf-token": sdk._csrfToken } : {}),
          },
          body: JSON.stringify({ name: "World" }),
        }
      )

      return response.json()
    }
    ```
  </Tab>

  <Tab title="Events">
    Use workspace events when the page needs real-time behavior or long-running automation feedback.

    ```tsx theme={null}
    const events = await sdk.streamEvents(workspace.id, {
      "source.sessionId": true,
    })

    events.on("app.greeting.completed", (event) => {
      console.log(event.payload)
    })

    events.emit("app.greeting.requested", { name: "World" })
    ```
  </Tab>

  <Tab title="Activity">
    Every automation run and event emission can be inspected from **Activity**. Use the generated correlation ID to follow the full trace from page action to backend execution.
  </Tab>
</Tabs>

## Build Locally: The `starter-spa` Reference App

If you prefer to author the page in your own IDE and deploy with a script, use the **`starter-spa`** starter at [github.com/prismeai/starter-spa](https://github.com/prismeai/starter-spa). It is the **same React + Radix + Tailwind template** the in-Builder **+ Page → New SPA** action seeds, exported as a stand-alone repo you can clone, edit, and `npm run release` to your workspace.

```bash theme={null}
git clone https://github.com/prismeai/starter-spa my-app
cd my-app
npm install
cp .env.example .env       # PRISMEAI_API_URL + PRISMEAI_ACCESS_TOKEN + PRISMEAI_WORKSPACE_ID
npm run dev                # local Vite dev server with a mocked host
npm run release            # build + deploy to your workspace
```

The starter is the smallest possible example of the host contract:

* `src/App.tsx` — the React entry point. **Its default export is what the platform renders.** Receives `{ sdk, user, workspace, backends, agents }` as props.
* `automations/v1/status.yml` — a webhook endpoint, called from the REST tab of the demo.
* `automations/on-app-greeting-requested.yml` — listens for `app.greeting.requested`, emits `app.greeting.completed`. Drives the WebSocket tab of the demo.
* `scripts/deploy.mjs` — does the full sync (automations + source files + bundle + version snapshot) and patches `config.value.bundles[<slug>]` so `AppRenderer` picks up the new bundle on next load.

The same loader and the same `AppProps` contract apply to **built-in apps shipped by the platform** and to **custom apps you build with this starter** — what you author here is loaded exactly like a first-party app.

Use the starter when you want:

* An IDE + Git workflow instead of the in-Builder editor.
* A CI-friendly deploy path (`npm run release` from a pipeline).
* A reproducible local dev loop with a mocked SDK (`src/lib/mockHost.ts`).

The starter's `README.md` covers the full deploy script, externals policy (never bundle React or `@prisme.ai/sdk`), and the conflict-detection / safe-retry semantics in detail.

## End-to-end Example: Page → Automation → Live Updates

This walk-through wires a React page to a backend automation that does work asynchronously and streams progress back to the UI. It exercises the three integration patterns at once: HTTP request, event subscription, and Activity tracing.

The use case: a user clicks **Generate report** in the page. The backend kicks off a long-running task that emits intermediate events (`report.generating`, `report.progress`, `report.ready`). The page reflects the progress in real time, then shows a download link when the report is ready.

### 1. The automation

Create an automation called `generate-report`:

```yaml theme={null}
slug: generate-report
name: Generate report
when:
  endpoint: true
arguments:
  parameters:
    type: object
    properties:
      reportType:
        type: string
        enum: [weekly, monthly]
    required: [reportType]
do:
  - emit:
      event: report.generating
      payload:
        reportType: "{{body.reportType}}"
        correlationId: "{{run.correlationId}}"

  - repeat:
      until: 5
      do:
        - wait:
            timeout: 2          # Simulated work
        - emit:
            event: report.progress
            payload:
              correlationId: "{{run.correlationId}}"
              percent: "{% ({{$index}} + 1) * 20 %}"

  # ... actual report generation logic (fetch, run, etc.) ...

  - set:
      name: reportUrl
      value: "https://files.example.com/{{run.correlationId}}.pdf"

  - emit:
      event: report.ready
      payload:
        correlationId: "{{run.correlationId}}"
        url: "{{reportUrl}}"

output:
  correlationId: "{{run.correlationId}}"
```

Key points:

* The automation **emits a correlation ID** in every event. The page uses it to filter the events it cares about (otherwise it would receive every `report.*` event in the workspace).
* The HTTP response returns the correlation ID immediately. The actual work happens after the response is sent.
* `report.progress` is fired N times during the work — these drive the UI progress bar.

### 2. The page

In the page source, call the webhook and subscribe to its events.

```tsx theme={null}
import { useState, useEffect } from "react"

interface AppProps {
  sdk: SDK
  user: unknown
  workspace: { id: string; slug: string; name: string }
}

export default function App({ sdk, workspace }: AppProps) {
  const [status, setStatus] = useState<"idle" | "running" | "ready" | "error">("idle")
  const [progress, setProgress] = useState(0)
  const [reportUrl, setReportUrl] = useState<string | null>(null)

  async function generate() {
    setStatus("running")
    setProgress(0)
    setReportUrl(null)

    // 1) Start the automation. The response carries the correlation ID
    //    we will filter events on.
    const res = await fetch(
      `${sdk.host}/workspaces/slug:${workspace.slug}/webhooks/generate-report`,
      {
        method: "POST",
        headers: {
          "Content-Type": "application/json",
          ...(sdk.token ? { Authorization: `Bearer ${sdk.token}` } : {}),
          ...(sdk._csrfToken ? { "x-prismeai-csrf-token": sdk._csrfToken } : {}),
        },
        body: JSON.stringify({ reportType: "weekly" }),
      }
    )
    const { correlationId } = await res.json()

    // 2) Subscribe to events that carry this correlation ID.
    const events = await sdk.streamEvents(workspace.id, {
      "payload.correlationId": correlationId,
    })

    events.on("report.progress", (e) => setProgress(e.payload.percent))
    events.on("report.ready", (e) => {
      setReportUrl(e.payload.url)
      setStatus("ready")
      events.destroy()              // 3) Clean up the subscription.
    })
    events.on("report.error", () => {
      setStatus("error")
      events.destroy()
    })
  }

  return (
    <div className="p-6 space-y-4">
      <button
        onClick={generate}
        disabled={status === "running"}
        className="px-4 py-2 bg-blue-600 text-white rounded"
      >
        Generate report
      </button>

      {status === "running" && (
        <div className="w-full bg-gray-200 h-2 rounded">
          <div
            className="h-2 bg-blue-600 rounded transition-all"
            style={{ width: `${progress}%` }}
          />
        </div>
      )}

      {status === "ready" && reportUrl && (
        <a href={reportUrl} className="text-blue-600 underline">
          Download report
        </a>
      )}

      {status === "error" && (
        <p className="text-red-600">Something went wrong. Check Activity for details.</p>
      )}
    </div>
  )
}
```

What's happening:

1. **HTTP call** — the page POSTs to the automation's webhook and receives the correlation ID synchronously.
2. **Event subscription** — `sdk.streamEvents` opens a workspace-scoped event stream. The filter `"payload.correlationId": correlationId` narrows the stream to events from this specific run.
3. **Cleanup** — the stream is closed as soon as the final event arrives or an error happens. Forgetting this leaks websockets.

### 3. Tracing it in Activity

Open the **Activity** tab while the page runs. Filter by `source.correlationId = <id>` (you can copy it from the network panel of the page, or have the page log it). You will see, in order:

| Event                            | Source            | Notes                       |
| -------------------------------- | ----------------- | --------------------------- |
| `runtime.webhooks.calledStarted` | the user / page   | The webhook hit.            |
| `runtime.automations.executed`   | runtime           | The automation run started. |
| `report.generating`              | `generate-report` | Emitted at the top of `do`. |
| `report.progress` (×5)           | `generate-report` | One per loop iteration.     |
| `report.ready`                   | `generate-report` | Final event.                |
| `runtime.automations.completed`  | runtime           | Run finished.               |

The correlation ID threads through the whole flow — this is the same trace the page receives over the websocket. See [Testing & Debugging → Activity](/products/ai-builder/testing-debugging) for the full filter grammar.

### Patterns this example demonstrates

| Pattern                                                  | Where it lives in the code                                                      |
| -------------------------------------------------------- | ------------------------------------------------------------------------------- |
| Fire-and-forget request with a correlation ID handle     | `generate()` reads `correlationId` from the webhook response.                   |
| Server-pushed progress                                   | `sdk.streamEvents` + `events.on("report.progress")`.                            |
| Driving UI state from events (show / hide / progress)    | `setProgress`, `setStatus`, `setReportUrl`.                                     |
| Filtered subscription (one run, not the whole workspace) | `"payload.correlationId": correlationId` in the stream filter.                  |
| Predictable Activity trace                               | The automation always emits the correlation ID; the Activity filter matches it. |

For longer-running flows, the same scaffold works: emit `*.partial` events as data becomes available, end with a `*.ready` or `*.error`, and clean up the subscription when you receive a terminal event.

## Page Styling

The Builder page template ships with **Tailwind CSS**, configured the way most React/Vite projects use it. Anything you would normally do with Tailwind works as-is — utility classes, custom theme tokens in `tailwind.config.ts`, component classes via `@apply`, etc.

The platform adds a few Prisme-specific bits on top of the standard Tailwind setup.

### Theme handover from the embed

When the page is rendered through `embed.js` (see [Deploy modal → Share tab](/products/ai-builder/deployment#share-tab)), the host script forwards optional theming attributes to the React app:

| `data-*` on `<script>`         | Forwarded as                                                          | Use in CSS                                                        |
| ------------------------------ | --------------------------------------------------------------------- | ----------------------------------------------------------------- |
| `data-theme="dark"`            | `props.theme` *and* a `data-theme="dark"` attribute on the mount root | `[data-theme="dark"] .…` Tailwind variants or plain CSS selectors |
| `data-primary-color="#0066ff"` | CSS variable `--prismeai-primary` on the mount root                   | `bg-[var(--prismeai-primary)]`                                    |
| `data-background-color="…"`    | CSS variable `--prismeai-bg` on the mount root                        | `bg-[var(--prismeai-bg)]`                                         |

Wire the variables into your Tailwind theme once and every component picks them up:

```ts theme={null}
// tailwind.config.ts
export default {
  theme: {
    extend: {
      colors: {
        brand: "var(--prismeai-primary)",
        canvas: "var(--prismeai-bg)",
      },
    },
  },
} satisfies Config
```

```tsx theme={null}
<button className="bg-brand text-white">Send</button>
```

### Globals and resets

The starter ships a `src/styles/globals.css` with the Tailwind directives and a minimal reset:

```css theme={null}
@tailwind base;
@tailwind components;
@tailwind utilities;
```

Override or extend it like any Tailwind project. **Do not** import a second Tailwind CDN — `embed.js` already injects one for hosts that want a zero-config shell, and double-loading produces specificity surprises.

### When in doubt

For everything that is not Prisme-specific (utility classes, plugins, JIT options, dark mode strategy, etc.), the [Tailwind documentation](https://tailwindcss.com/docs) is the source of truth. The same applies to React, Vite, and Radix — Builder pages use them in the standard way.

## Deployed Bundles

When a workspace has deployed page bundles, Builder lists them under **Pages** as read-only entries. Read-only pages use a lock icon and cannot be edited from the source editor. Use them to inspect the deployed app while keeping the editable source separate.

To change a deployed page:

1. Open the editable `index` source.
2. Make and save changes.
3. Deploy the workspace again.
4. Reopen the deployed bundle preview.

## Files and Assets

The **Files** section is separate from the page source tree. Use it for uploaded assets that belong to the workspace, such as PDFs, images, spreadsheets, or other binary files.

For app source files, use **Pages** > **Code**. For workspace uploads, use **Files**.

## Troubleshooting

<AccordionGroup>
  <Accordion title="The preview stays on Initializing">
    Open **Code** and verify that the workspace has a valid React entry point such as `src/App.tsx` and `src/main.tsx`. If no files exist, initialize the template.
  </Accordion>

  <Accordion title="The page shows a build error">
    Read the error in the preview, fix the corresponding source file, and return to Preview. Typical causes are invalid imports, missing exports, or TypeScript syntax errors.
  </Accordion>

  <Accordion title="The page cannot call an automation">
    Check that the automation endpoint exists, that the URL uses the current workspace slug, and that authentication headers include the platform token and CSRF token when required.
  </Accordion>

  <Accordion title="The UI action ran but no result appeared">
    Open **Activity**, filter by the correlation ID, and inspect the automation trace. The request may have reached the backend but failed inside an instruction.
  </Accordion>
</AccordionGroup>

## Next Steps

<CardGroup cols={2}>
  <Card title="Automations" icon="gears" href="/products/ai-builder/automations">
    Build the backend workflows that pages call.
  </Card>

  <Card title="Testing & Debugging" icon="vial" href="/products/ai-builder/testing-debugging">
    Trace page actions through Activity and correlation IDs.
  </Card>

  <Card title="Integrations" icon="plug" href="/products/ai-builder/integrations">
    Connect pages and automations to external systems.
  </Card>

  <Card title="Deployment" icon="rocket" href="/products/ai-builder/deployment">
    Publish the workspace once the page is ready.
  </Card>
</CardGroup>
