> ## Documentation Index
> Fetch the complete documentation index at: https://docs.prisme.ai/llms.txt
> Use this file to discover all available pages before exploring further.
# Creating Agents
> Build a new AI agent step by step
Create an agent to automate tasks, answer questions, or help users accomplish goals. The creation wizard guides you through the essential configuration.
## Video Tour: Create and Publish an Agent
This video is currently available in French.
## Starting the Wizard
1. Open Agent Creator
2. Click **Create Agent** in the top right
3. Choose how to start:
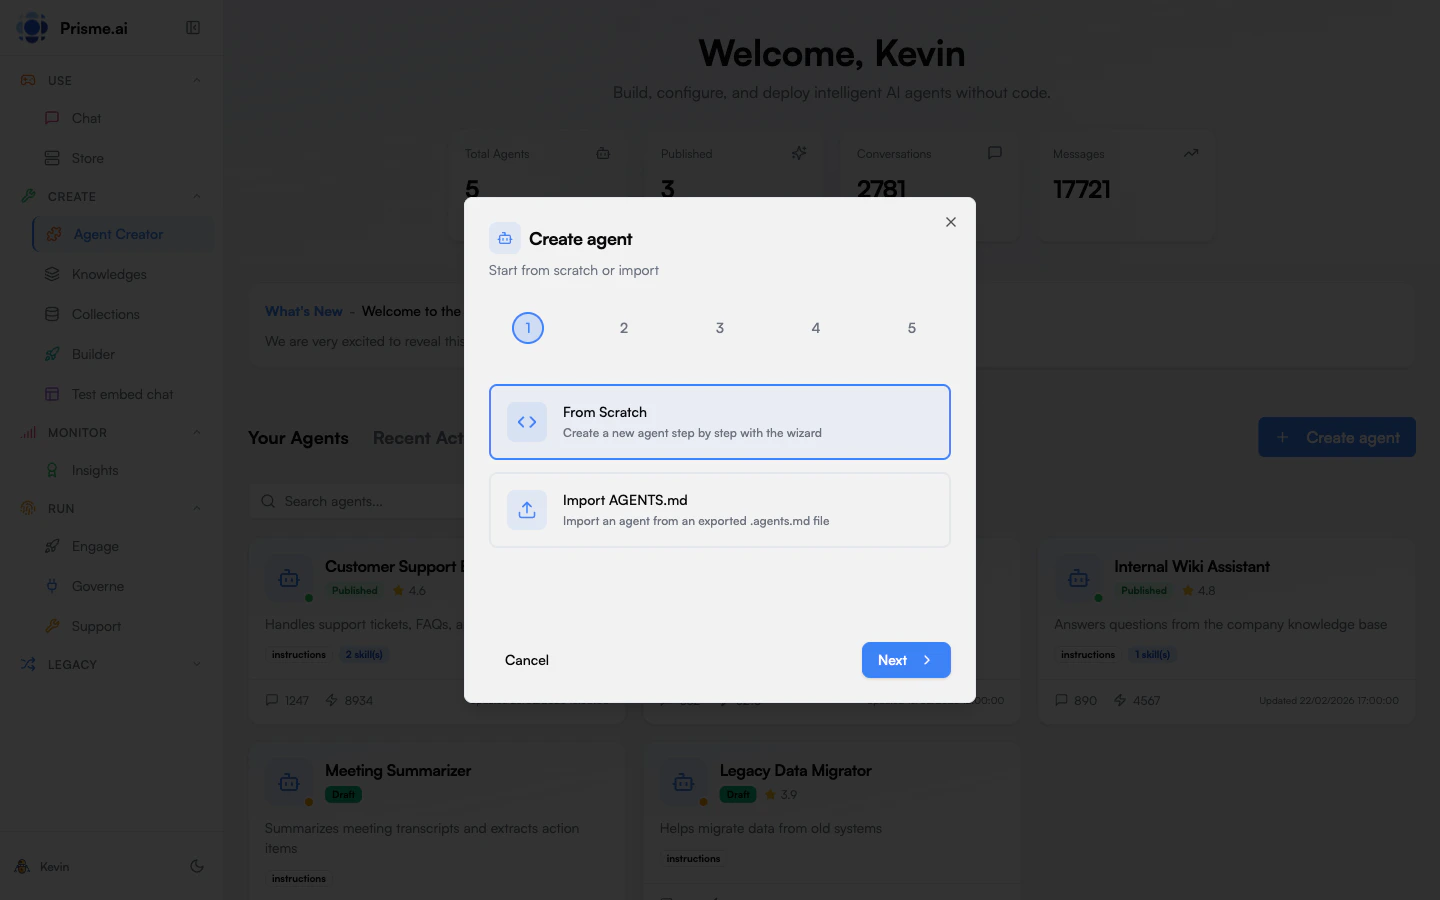 | Option | Description |
| -------------------- | ------------------------------------------- |
| **From Scratch** | Walk through the wizard step by step |
| **Import AGENTS.md** | Upload an exported agent configuration file |
## Wizard Steps
### 1. Choose a Profile
Select the complexity level for your agent:
Single-turn responses without tools. Best for:
* FAQ bots
* Simple Q\&A
* Text generation tasks
Multi-turn conversations with basic tool use. Best for:
* Task-oriented assistants
* Document search and retrieval
* Simple workflows
Advanced autonomy with planning and reflection. Best for:
* Complex research tasks
* Multi-step workflows
* Tasks requiring judgment
Coordinates multiple agents. Best for:
* Multi-domain problems
* Specialized agent teams
* Enterprise workflows
Not sure? Start with **Light Agent**. It handles most use cases and you can upgrade later.
### 2. Name and Description
Give your agent an identity:
* **Name** - A clear, descriptive name (e.g., "HR Policy Assistant")
* **Description** - What the agent does and who it's for
The description helps users understand what your agent can help with when they discover it in the gallery.
### 3. Select a Model
Choose the AI model that powers your agent. Your organization may have specific models available. Consider:
* **Capability** - More powerful models handle complex reasoning better
* **Speed** - Faster models respond more quickly
* **Cost** - Usage is typically metered by tokens processed
Model availability depends on your organization's configuration. Contact your admin if you need access to additional models.
### 4. Write Instructions
Define how your agent should behave. This is your agent's "personality" and guidelines.
```text theme={null}
You are an HR Policy Assistant for Acme Corp.
Your role:
- Answer questions about company policies
- Help employees find the right forms and procedures
- Escalate sensitive matters to HR representatives
Guidelines:
- Be professional but friendly
- Cite specific policy documents when answering
- If unsure, say so rather than guessing
```
Keep initial instructions brief. You can refine them after testing in the playground.
## After Creation
Your new agent opens in the workspace, where you can:
1. **Test it** - Open the Playground and start a conversation
2. **Add capabilities** - Connect knowledge bases and tools
3. **Refine instructions** - Improve based on testing
4. **Publish** - Make it available to others
## Importing Agents
To import an existing agent:
1. Click **Create Agent**
2. Select **Import AGENTS.md**
3. Choose your `.agents.md` or `.md` file
4. Click **Import**
The import creates a new agent with the configuration from the file. You can then modify it as needed.
AGENTS.md is the portable format for agent configurations. Export any agent to get this file and share it or version control it.
## Exporting Agents
To export an agent:
1. Open the agent's workspace
2. Click the menu (three dots) in the header
3. Select **Export**
This downloads an `.agents.md` file containing:
* Name and description
* Instructions
* Model configuration
* Tool and knowledge base references
## Next Steps
After creating your agent:
Learn prompt engineering techniques for effective agent behavior
Connect tools and knowledge bases to extend what your agent can do
| Option | Description |
| -------------------- | ------------------------------------------- |
| **From Scratch** | Walk through the wizard step by step |
| **Import AGENTS.md** | Upload an exported agent configuration file |
## Wizard Steps
### 1. Choose a Profile
Select the complexity level for your agent:
Single-turn responses without tools. Best for:
* FAQ bots
* Simple Q\&A
* Text generation tasks
Multi-turn conversations with basic tool use. Best for:
* Task-oriented assistants
* Document search and retrieval
* Simple workflows
Advanced autonomy with planning and reflection. Best for:
* Complex research tasks
* Multi-step workflows
* Tasks requiring judgment
Coordinates multiple agents. Best for:
* Multi-domain problems
* Specialized agent teams
* Enterprise workflows
Not sure? Start with **Light Agent**. It handles most use cases and you can upgrade later.
### 2. Name and Description
Give your agent an identity:
* **Name** - A clear, descriptive name (e.g., "HR Policy Assistant")
* **Description** - What the agent does and who it's for
The description helps users understand what your agent can help with when they discover it in the gallery.
### 3. Select a Model
Choose the AI model that powers your agent. Your organization may have specific models available. Consider:
* **Capability** - More powerful models handle complex reasoning better
* **Speed** - Faster models respond more quickly
* **Cost** - Usage is typically metered by tokens processed
Model availability depends on your organization's configuration. Contact your admin if you need access to additional models.
### 4. Write Instructions
Define how your agent should behave. This is your agent's "personality" and guidelines.
```text theme={null}
You are an HR Policy Assistant for Acme Corp.
Your role:
- Answer questions about company policies
- Help employees find the right forms and procedures
- Escalate sensitive matters to HR representatives
Guidelines:
- Be professional but friendly
- Cite specific policy documents when answering
- If unsure, say so rather than guessing
```
Keep initial instructions brief. You can refine them after testing in the playground.
## After Creation
Your new agent opens in the workspace, where you can:
1. **Test it** - Open the Playground and start a conversation
2. **Add capabilities** - Connect knowledge bases and tools
3. **Refine instructions** - Improve based on testing
4. **Publish** - Make it available to others
## Importing Agents
To import an existing agent:
1. Click **Create Agent**
2. Select **Import AGENTS.md**
3. Choose your `.agents.md` or `.md` file
4. Click **Import**
The import creates a new agent with the configuration from the file. You can then modify it as needed.
AGENTS.md is the portable format for agent configurations. Export any agent to get this file and share it or version control it.
## Exporting Agents
To export an agent:
1. Open the agent's workspace
2. Click the menu (three dots) in the header
3. Select **Export**
This downloads an `.agents.md` file containing:
* Name and description
* Instructions
* Model configuration
* Tool and knowledge base references
## Next Steps
After creating your agent:
Learn prompt engineering techniques for effective agent behavior
Connect tools and knowledge bases to extend what your agent can do